Tuesday, 24 November 2015

It’s Turkey Time!

by April Chorba, product director, pom-pom princess, and easily distracted by sparkly things

Thanksgiving is right around the corner and a personal reminder that I am not a gourmet cook. Now, I can throw a turkey in an oven and mash some potatoes, but my cranberries always come from a can, my stuffing from a box, and my pumpkin pie from the grocery store.

But who cares, it’s all about presentation anyways! And this year my guests will be so impressed with my personalized pom-pom turkeys, they’ll never care that the gravy came from a jar.

What you need:
• Brown yarn
• Black beads (for eyes)
• Construction paper (for the beak and gobbler)
• A piece of floral wire about 3.5 inches long (cut with nail clippers if your piece is too long)
• Craft glue

To make the head:

Use the materials and directions from Mini Pom-Pom Pets to make one tiny pom-pom with a fork.


To make the body:

Use the materials and directions from Pom-Pom Monster Salon or Pom-Pom Puppies to make one big pom-pom.


OR


Once you have made your head and body pom-pom, trim them as shown below. Leave a few pieces long on each side of the body for wings, and a few pieces on the back for tail feathers. Use a brush or a comb to fluff out the long pieces.


To connect the two pom-poms, slide the wire through the top of the head and into the body. Position the head on the body so the tail feathers are pointing up.


Glue on the eyes, beak and wattle. If your gobble wobbles, cut the bottom of the body flat so she sits upright. 


Place your adorable turkey on a plate with a handmade name card. Glue on tiny bows for all of your girly-girl guests. Have a happy turkey day! Be thankful for family, friends, and glitter (I am).


Wednesday, 18 November 2015

Holiday Gifts Ideas with Dot Jewelry

Vicky Eva, Klutz buyer, DIY queen, and (most importantly) proud mama
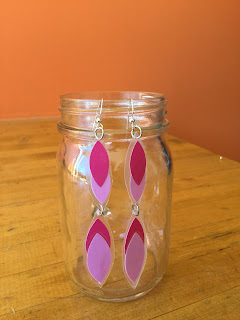
I love making jewelry with my almost 10-year-old niece; she is a feisty fashionista and loves wearing all kinds of accessories. With the holiday season quickly approaching I wanted to get a head start on a gift for her, but I wanted something special, something handmade. The Klutz Dot Jewelry book was my inspiration for the perfect gift for my niece—handmade jewelry.
http://store.scholastic.com/webapp/wcs/stores/servlet/SearchCmd?Ntt=Klutz%3A+Dot+Jewelry&storeId=11301&isbn13=9780545492782&N=4502+4519&langId=-11301&catalogId=16551&ddkey=http:SearchCmd

The shapes and patterns are fun to use and to wear. I grabbed some of my jewelry findings like earring wires, jump rings, and chains from around the house and started to get to work. Since I knew I would be adding holes into the paper pieces from the Dot Jewelry book, I used some laminating sheets for added reinforcement. I can’t wait to give her these gifts!


Even after making all these pieces for her, there are still more than 1,000 dots and other shapes left from the kit! I can’t wait to see her for the holidays and continue our jewelry-making experience.  

Friday, 23 October 2015

Hello Tissue Paper!

by Edward Quiceno, marketing assistant, crafting novice, and hot chocolate connoisseur
I recently starting working at this lively place called KLUTZ, and quickly realized I had formidable crafting competition. To be frank, I had never really crafted before, or maybe I had and just didn’t realize I was crafting. So I thought that Halloween celebrations would be a great opportunity to put my crafting skills to the test and surprise everyone at the office.

Luckily, I found myself being inspired and excited by the range of options Klutz books has to offer. Hoping to make some decorations that would wow the office, I found the perfect book to assist me in my endeavor.

Hello tissue paper! Klutz’s Tissue Paper Crafts was my saving grace. 

Tissue Paper Crafts

I figured I could use some company, and help, and hot chocolate, so my friend Caro and my sister Yoly teamed up with yours truly to make some awesome crafts. Plus, this crafting session was a fun way to accompany some delicious hot chocolate.


We started off our Halloween decorating with some “pumpkin” making: 


I was excited to see how quickly the pumpkins could be made (my crafting ego was growing). The book is great because it comes with step-by-step instructions to make shapes and sizes that can be used as garlands, flowers, or hey, even pumpkins. Feeling inspired we then decided to step it up a notch and make a DĂ­a de los Muertos (Day of the Dead) design to activate some wall space. Check out some of our specially-designed Halloween decorations:

Halloween Decorations with Tissue Paper

Stay tuned for my journey to crafting fame; I’m coming for the crafting throne!

Wednesday, 21 October 2015

Four Last-Minute Finger-Knit Costumes

by Caitlin Harpin, editor and Junior Mints enthusiast

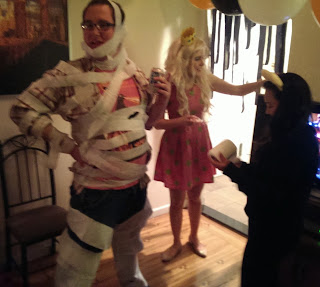
I take Halloween seriously. So seriously in fact, that if a party guest shows up without a costume, I’ll insist on providing one from my stash of goofy accessories and ordinary household items. (If you show up fashionably late, there’s a not-bad chance that you may end up being a toilet paper mummy.)

This year, I decided to get a little craftier. Finger knitting is a super-quick craft that even younger kids can do—and it takes a lot less time than traditional knitting. Here are several ideas you can throw together before you head out to your Halloween festivities.

Crafty Cat

You’ll need: one skein of black yarn, a smidge of face paint, and an extra ball of yarn to use as your cat’s toy.

Both the cat headband and the fringe scarf are step-by-step projects you can find in Finger Knitting. Make them in matching colors for a costume you can assemble in an afternoon.
http://store.scholastic.com/webapp/wcs/stores/servlet/SearchCmd?Ntt=Klutz%3A+Finger+Knitting&storeId=11301&isbn13=9780545858458&N=4502+4519&langId=-11301&catalogId=16551&ddkey=http:SearchCmd
Princess Leia
You’ll need: one skein of brown yarn, a white cowl-neck top or dress, two hair bands, and lots of bobby pins!

Simply finger-knit two chains of yarn, about 48 inches (122 cm) long. Part your hair down the center, and tie it into two pigtails or little buns, depending on how long your hair is. Then spiral a finger-knit chain around each pigtail or bun, securing the chain with bobby pins as needed. 

Jacques Cousteau
You’ll need: one skein of red yarn, a chambray or light blue shirt, and a French accent.

Another project from Finger Knitting, the spiral hat is a bit more ambitious. Roll up the brim and stretch the top out a bit to make a Cousteau Society-approved accessory.

Swamp Thing
You’ll need: multiple skeins of yarn in different shades of green . . . green hair is optional.

What to do with all of your leftover finger-knit chains? Drape them around you in a haphazard fashion, and you’re the creature from the Knit Lagoon. If you want to be truly terrifying you can grab green face paint from Klutz’s Face Painting book and scare just about anyone out of their stash of candy on Halloween. 

I hope these ideas inspire you to make your own craft costume this year! And remember, if all else fails, you can always be a toilet-paper mummy.

Friday, 9 October 2015

So Much More Than a Beaded Band

By Vicky Eva, Klutz buyer, DIY queen, and (most importantly) proud mama
Before I worked for Klutz I used to be a buyer for a beads company, and oh how I loved it. I got to play with beads and make jewelry EVERY DAY. Pretty neat, huh? These days, with a little one and a new home, it’s a lot harder to find the time for crafting but I make a conscious effort to make time for it because it’s inspiring. Recently, Klutz's Beaded Bands inspired me to revisit my roots in beading. 
http://store.scholastic.com/Books/Interactive-and-Novelty-Books/Klutz-Beaded-Bands

The book teaches kids how to make cute beaded bracelets, but I thought it would be fun to make something that would be multi-functional for me—beaded headbands that can act as necklaces as well. (I wasn’t kidding when I said I don’t have too much free time. I need my crafting to be productive!) After studying the techniques from the book, I grabbed some stretchy cord, and voilĂ ! 

It was such a joy to make these projects. Not only was the crafting stress-relieving, the results were so rewarding. These headbands/necklaces will look great with my short hairstyle but I must say . . . they look much better on my model.


Friday, 18 September 2015

String Art Made Me a Better Cook!

by Rachele Harmuth—a salesperson by trade, a crafter by choice, and a somewhat acceptable cook by necessity. 
 
Surround me with glue and paper and pom-poms and I’m in my element. Instinct sets in, creative juices flow, and all is right with the world. 
Surround me with veggies, knives, and a cutting board, and well . . . let’s just say there is no “instinct” and certainly no creative juices. To my credit though, when I have enough focused, uninterrupted time and a good recipe, I can create a pretty decent meal. Did you see the key words? “Focused, uninterrupted time.” HA! You see, I have three fabulous kiddos and every night at dinner prep time at least one of them seems to have a total mommy-I-need-you-this-moment-or-my-life-is-over meltdown. This becomes the hour when there’s “nothing to do.” They’ve done everything, played with everything, and oddly they are never excited by my suggestion that they could always clean their rooms.
On a recent night, while I was determined to have a “real” meal of roasted chicken and potatoes, it was my 7-year-old who couldn’t find anything to do. Dragging herself into the kitchen, she flopped into a chair and declared that there was NOTHING to do because everyone was on vacation except us! Knowing what was coming, I darted into my office to see if there was anything new that might hold her attention. And that’s when I grabbed String Art.
http://store.scholastic.com/Books/Interactive-and-Novelty-Books/Klutz-String-Art

Now, I’ll be honest, I assumed String Art would be pretty hard. I imagined that the next hour would involve me bopping back and forth between her and the chicken as she declared every two minutes that she needed help, and we’d end up eating burned chicken at midnight. But hey, it was better than listening to the “I’m bored” speech. I figured we’d give it a try.

OMG. Best. Kit. Ever. 
The designs were SO cute. She wanted to do all of them. The instructions were so simple. I literally helped for about five minutes before the “Mom, I’ve got this” comment. So I stepped back into the kitchen. I kept peeking over at her but she was totally engrossed. Each step was laid out in such an accessible way. There were so many designs to choose from and she loved picking them out. She completed every step herself, from tracing to placing the pins. The special tool included with the kit took all the frustrating parts out by making each pin exactly the same height. As I glanced at her occasionally over the chicken, I noticed a really cool art piece forming under her hands. I have to say it really looked great!